PresenZ Sequencer
Introduction
The PresenZ Sequencer is a compact editing software designed for managing and editing volumetric data in the V-Nova PresenZ format, specifically przToc files. It enables users to make precise edits that are compatible with the PresenZ Player, ensuring a seamless experience for viewing volumetric content.
Features
Timeline-based editing for przToc files
Integrated directory browser for easy file management
Filtered content panel for quick access to relevant files
Shot property editor for detailed shot adjustments
User Interface Overview

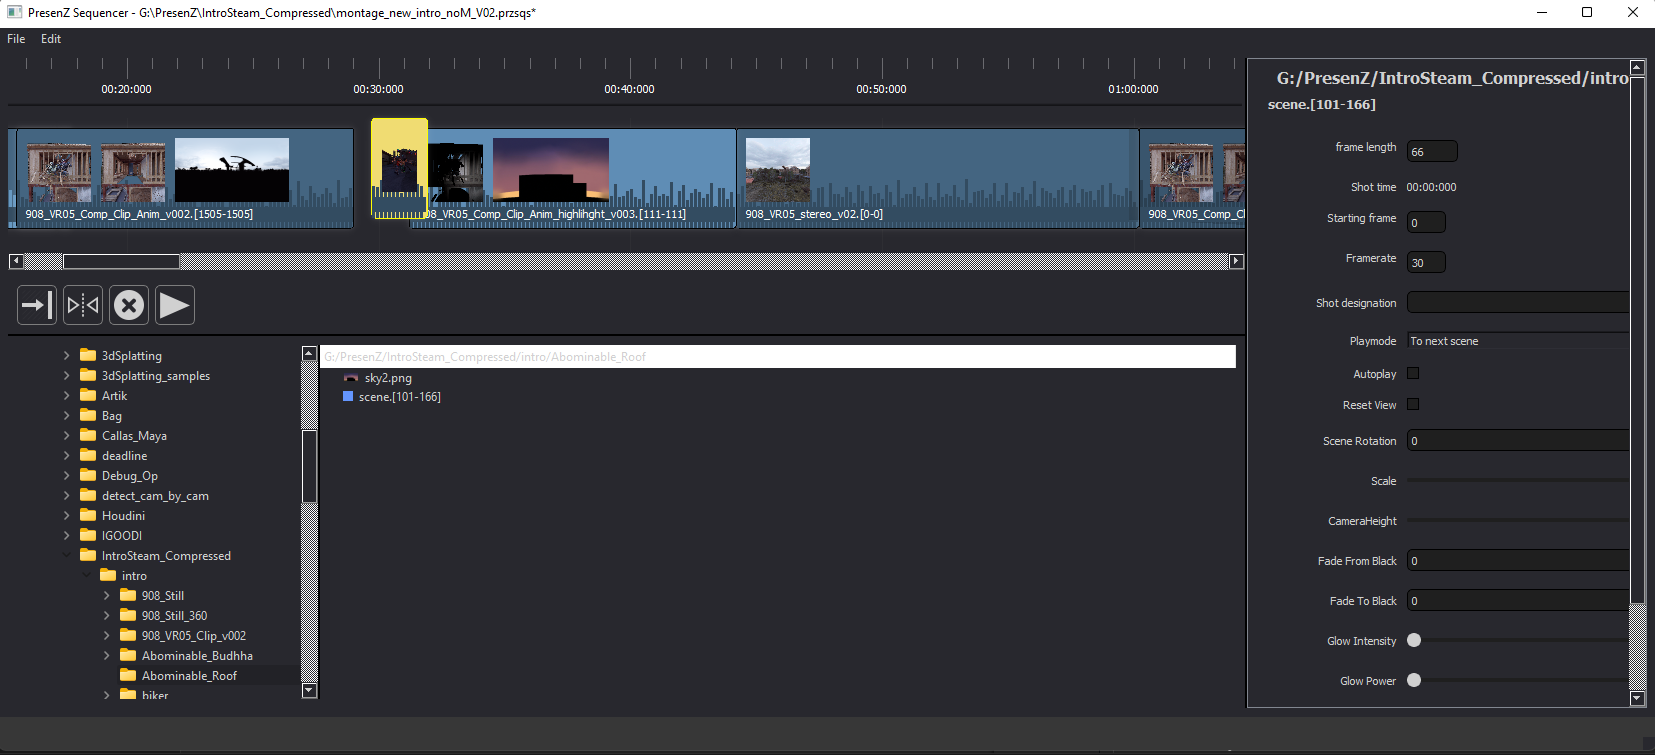
The PresenZ Sequencer’s interface is divided into several key areas, each optimized for a specific part of the editing workflow.
Timeline Area: The timeline at the top of the interface represents the sequence of shots and their respective durations. It allows users to arrange, trim, and time their content with precision.
Directory Browser: Located at the bottom left of the interface, the directory browser facilitates navigation through the file system, enabling quick access to PresenZ assets and projects.
Filtered Directory Content: Adjacent to the directory browser, this panel displays the contents of the selected directory, filtered to show only the files relevant to the current task.
Shot Property Editor: The pane on the right side of the interface is dedicated to editing the properties of the selected shot. It offers a range of settings to customize each shot’s parameters within the sequence.
Getting Started
The PresenZ Sequencer allows you to create an engaging and interactive volumetric sequence with ease. Follow these steps to begin editing your prz sequence:
Launch the PresenZ Sequencer.
Navigate to a folder containing your prz sequence files using the Directory Browser located at the bottom left of the interface.
Drag and drop the prz sequence files onto the Timeline at the top of the interface to import them.
Once imported, you can rearrange the order of your shots simply by dragging them along the Timeline to the desired position.
To add a 360 equirectangular image as a background, drag and drop a 3000x2000 image directly onto the clip in the timeline. This image will serve as the environmental backdrop in the PresenZ Player.
For audio, you can add an ambisonic opus format sound file by dragging it onto the shot where the sound should begin. The sound will sync with the visuals starting from that point in the sequence.
To use a single prz file as a background layer for the current shot, press and hold the Alt key while dragging the prz file onto the shot in the Timeline. This action layers the file behind the content of the selected shot, providing a way to compute a single fixed frame for non-animated content in a shot.
By following these steps, you set up your PresenZ Sequencer project and can proceed to refine your sequence using the various editing tools and features provided.
Editing With the Timeline
The Timeline is your primary tool for structuring the sequence of shots. Below is an explanation of the key buttons and their functions for editing within the Timeline.
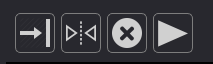
Mode Switch Button: This toggles between two modes:
Off: In this default mode, you can freely move and reorder shots within the Timeline.
On: When activated, moving a shot will push the subsequent shots forward, maintaining the sequence without overlapping.
Align Shots Button: Clicking this button will remove all empty spaces between shots in the sequence, effectively “snugging up” the shots to align them back-to-back without gaps.
Delete Button: This will remove any currently selected shots from the Timeline.
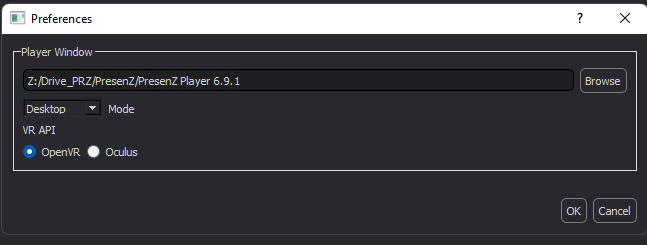
Play Button: This will launch the current edit in the PresenZ Player, given that the player is properly configured in the ‘Edit > Settings’ menu. This feature allows you to preview your sequence as it will appear in the final output.
To perform basic editing tasks such a moving shots, click and drag the entire shot block along the Timeline. Trimming the shot can be done in the property panel of the shot.
Using the Directory Browser
The Directory Browser is a simple feature of the PresenZ Sequencer that allows users to navigate through their file system with ease. It’s implemented as a tree list, which provides a hierarchical view of your folders.
To use the Directory Browser:
The Directory Browser is located at the bottom left of the PresenZ Sequencer interface.
Click on the folders to expand and collapse their contents, just like using a file explorer in a typical operating system.
Navigate through the folders by clicking on them. This will reveal the contents of the folder in the adjacent Filtered Directory Content panel.
Managing Filtered Content
The Filtered Content panel simplifies the process of finding and managing media files for your PresenZ project. It automatically filters and displays only the files that are relevant for use in the PresenZ Sequencer, specifically:
.prz sequences or single .prz files
.opus files for ambisonic audio
.png & .jpg files for static bacgrounds
.mp4 files for video backgrounds
To work with the Filtered Content panel:
Once a directory is selected in the Directory Browser, the Filtered Content panel, located next to the Directory Browser, will update to show only the files of the types listed above.
This automatic filtering helps maintain a clean workspace, allowing you to focus on the files that are immediately useful to your current task without the clutter of unrelated file types.
You can select one or multiple files from this panel to drag them onto the Timeline.
Adjusting Shot Properties
Adjusting Shot Properties
The Shot Property Editor is an essential feature of the PresenZ Sequencer that allows for precise control over various aspects of each shot. The panel is displayed on the right side of the interface and includes the following parameters:

Informational Parameters:
Length in frames: Displays the total number of frames in the shot.
Shot start time: Shows the starting time of the shot within the sequence.
Editable Parameters:
Start Cut: Trims the beginning of the clip by the specified number of frames.
End Cut: Trims the end of the clip by the specified number of frames.
Framerate: Alters the playback speed of the shot.
Playmode: Sets the behavior at the end of the shot. Options include proceeding to the next shot, pausing at the end, pausing at the start, or looping.
Autoplay: When enabled, the shot will play automatically.
Reset View: If checked, the viewer’s orientation is reset to the forward position of the current shot in the player.
Scene Rotation: Rotates the default forward position of the shot by the specified degree.
Scale: Scales the current zone of view up or down.
Camera Height: Adjusts the height of the zone of view in the virtual world.
Fade From Black / Fade To Black: Sets the number of frames for fading in or out from black at the start or end of the shot.
Glow Intensity / Glow Power: Adjusts the bloom effect in the shot.
Continue Audio: If checked, any playing sound will continue to play into this shot.
Audio Rotation: Rotates the ambisonic sound to match the shot orientation.
Background Rotation: Rotates the 360 background to align with the shot.
Utilize these parameters to fine-tune each shot. You can experiment with different settings to see how they affect the playback and find the perfect balance for your sequence. Adjustments can be previewed in the PresenZ Player to ensure the desired effect is achieved.
Remember to save your changes before exiting the Shot Property Editor to ensure all modifications are retained.
Saving and Exporting
The PresenZ Sequencer offers several options for saving and exporting your projects, accessible through the ‘File’ menu. Here’s how to use these options:
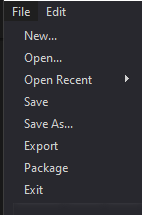
Save / Save As…
Save: Saves the current state of your project.
Save As…: Allows you to save the project under a new name or location.
Both ‘Save’ and ‘Save As…’ will save your edit in a proprietary format that is not directly supported by the player.
Export
Export: This option exports the current edit into a .prztoc file, which is the format compatible with the PresenZ Player. The export process will also adjust the paths to the shots to be relative to the .prztoc file’s folder.
Package
Package: This feature creates a self-contained folder by copying all the necessary frames used in the project to the same location as the .prztoc file. This package can then be easily distributed, as it contains all the elements required for playback.
Open Recent
Open Recent: Provides quick access to recently opened projects, allowing for efficient switching between different projects.
It’s important to regularly save your project to prevent data loss. When preparing for distribution or playback, use the ‘Export’ or ‘Package’ options depending on whether you need to create a relative path structure or a self-contained folder for distribution.