2.3. Maya Arnold Batch Rendering with PresenZ
2.3.1. Prerequisites
2.3.1.1. Copy the file to the correct folder.
In order to do batch rendering with PresenZ you will have to make sure your presenZArnoldRenderer.xml file is in the maya rendererDesc folder.
You can find the presenZArnoldRenderer.xml in your PresenZ installation folder which by default is in C:\Users\nozon\PresenZ\Maya2018\MtoA3.3.0\arnold_plugins_maya\renderDesc please copy this file to your Maya rendererDesc folder C:\Program Files\Autodesk\Maya2018\bin\rendererDesc.
2.3.1.2. Add a path to your environment variables.
Alternatively you can set up an environment variable in the Windows Environment Variables Settings pointing towards your PresenZ renderDesc folder, by default: MAYA_RENDER_DESC_PATH=C:\Users\nozon\PresenZ\Maya2018\MtoA3.3.0\arnold_plugins_maya\renderDesc .
2.3.2. Usage
When launching your render you will have to specify presenZArnold as the renderer. Where you would normally use the command -r arnold you will use -r presenZArnold.
The following is an example command for a PresenZ render using a Maya file with a PresenZ camera in the scene.
C:\Users\PresenZ>"C:\Program Files\Autodesk\Maya2018\bin\Render.exe" -r presenZArnold Z:\SharedTestScene\MAYA_ARNOLD\testingPlugin.mb
There are a couple of PresenZ specific command flags you can use, if you enter C:\Users\PresenZ>"C:\Program Files\Autodesk\Maya2018\bin\Render.exe" -r presenZArnold -help you will see the presenz specific flags listed.
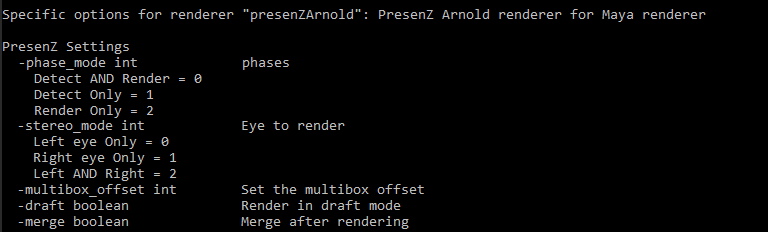
- detect_phase: When set to 1 will render the detect phase, this is the first phase of a PresenZ render. When set to 0 it will not render this phase.
- render_phase: When set to 1 will render the render phase, this is the second phase of a PresenZ render, and will require the przDetect phase to be completed. When set to 0 it will not render this phase.
- skip_existing_detect_file: When set to 1 will skip the detection file if one already exists.
- skip_existing_render_file: When set to 1 will skip the render file if one already exists.
- eye: When set to 0 will render left eye only, 1 for right eye only, 2 for both eyes.
- multibox_offset: by default set to 0 0 0 (3 Numbers with spaces), which translates to right top back. This flag will be needed for both phases, and both phases need the same resolution.
- draft: When set to 1 will enable a draft render. Rendered only from the Centre of the ZOV.
- merge: By default your render will be merged. Setting this flag with a value of 0 will not merge at the end of the render. Setting it to 1 will merge after render.
Example commands:
- this command will render both phases and both eyes in one go:
C:\Users\PresenZ>"C:\Program Files\Autodesk\Maya2018\bin\Render.exe" -r presenZArnold -eye 2 Z:\SharedTestScene\MAYA_ARNOLD\testingPlugin.mb - for rendering just the detect phase.
C:\Users\PresenZ>"C:\Program Files\Autodesk\Maya2018\bin\Render.exe" -r presenZArnold -detect_phase 1 -render_phase 0 Z:\SharedTestScene\MAYA_ARNOLD\testingPlugin.mb - for rendering just the render phase of the same file only the left eye.
C:\Users\PresenZ>"C:\Program Files\Autodesk\Maya2018\bin\Render.exe" -r presenZArnold -skip_existing_detect_file 1 -render_phase 1 -eye 0 Z:\SharedTestScene\MAYA_ARNOLD\testingPlugin.mb - rendering a multibox one ZOV over to the right
C:\Users\PresenZ>"C:\Program Files\Autodesk\Maya2018\bin\Render.exe" -r presenZArnold -eye 2 -multibox_offset 1 0 0 Z:\SharedTestScene\MAYA_ARNOLD\testingPlugin.mb - rendering animation version 1: if properly selected a frame range in the maya scene you will be able to just use the default command
C:\Users\PresenZ>"C:\Program Files\Autodesk\Maya2018\bin\Render.exe" -r presenZArnold Z:\SharedTestScene\MAYA_ARNOLD\testingPlugin.mb - rendering animation version 2: You can use the arnold flags to chose a frame range
C:\Users\PresenZ>"C:\Program Files\Autodesk\Maya2018\bin\Render.exe" -r presenZArnold -s 1 -e 10 Z:\SharedTestScene\MAYA_ARNOLD\testingPlugin.mb
You can use arnold commands like -rn path to set the output and -im filename to set the name of your file. In these cases make sure to include them in both phases.
For more commands regarding Arnold specifically, please use the Arnold batch rendering documentation: https://docs.arnoldrenderer.com/display/AFMUG/Batch+Render+Flags