Rendering
Output Render Path
Before rendering, you should specify the exact path to where you want to save the .PRZ file. In the 3ds Max Render Setup menu go to the V-Ray tab and under Frame Buffer enable the V-Ray raw image file checkbox. Input the full file path, for example “C:\path\to\renders\yourFileName.prz”.
V-Nova PresenZ will also create a przDetect and przRender folder at that location. These folders are used to store intermediate files generated by the PresenZ two phases system.
Note
You can add the <przCamName> token in the output path, it will be replaced by the zov name. This will prevent you to edit the path inbetween each render if you have multiple zone of view to render. For example : “C:\path\to\renders\yourFileName_<przCamName>.prz”.

Detecting, Rendering and merging
To render your PRZ image, select the PresenZ render button.
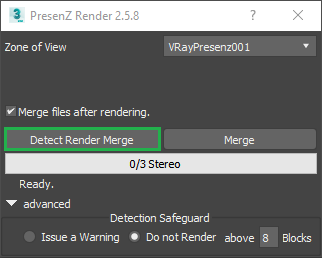
Zone of View: allows you to select which Zone of View you are going to render (Since you can have several in your 3D Scene).
Merge files after rendering: On by default. This will automatically start the merger after completing the different phases of the rendering process. Alternatively, you can manually merge your output files through the command line. This is explained in the PresenZ Utility Merger section.
Render button: This button will automatically launch the different PresenZ render phases, one after the other according your zov settings. It’s name will also change according to your settings. “Detect Render Merge” for instance.
Merge button: This button allows you to manually re-merge your .przRender files after they have been rendered.
Progress bar: Depending on the options the whole PresenZ render will take several phases and possibly passes (for instance opaque and glass passes). This will show you the progress in those phases/passes.
Detection Safeguard: located in the advanced section. This is on by defalut and set to 8 blocks. 8 blocks should be plenty to handle very complex scenes properly set. If the detection phase issues more than 8 blocks, usually it means your scene has complex geometry not tagged as Chaotic. Visit this section to reduce your number of blocks.
Note
The merge button is useful to apply your V-Ray Frame Buffer Color Correction Settings without having to re-render.
Note
Near the progress bar a number will indicate how many passes will be executed for your render, this number can change. For a normal render this number will be 3: a detection pass, a render pass, and the merge. As another example, if you have decided to render in “opaque and glass” mode, the whole PresenZ render will take more passes than a standard render. The total number of passes will be 5: one detection pass and render pass for the opaque objects, one detection and render pass for the transparent objects, and a final merge.
Motion Vectors And Animation
For a smooth animation, V-Nova PresenZ requires some settings to be correctly tuned for the motionvectors. See the General information for further details.
Warning
Unfortunately, we are not currently able to get the proper motion vector data with V-Ray for 3dsmax. We are working to fix this issue. As a workaround, animations can be rendered with proper motion vectors if exported in the V-Ray “.vrscene” file format. Please contact us at support@presenzvr.com to get more details on the vrscene rendering process with V-Nova PresenZ.